|
|
||||||

Advice
for Beginners on Keeping Australian Finches
by John Williams
| Part 1 Building an Aviary/Bird Room |
Part 2 The Outside Flight |
Part 3 Fitting-out the Bird Room |
Part 4 Stocking the Aviary/Birdroom |
| Part 5 Food and Diet |
Part 6 Healthcare and Diseases |
Part 7 Australian Finch Topography |
Part 8 Birdroom and Aviary Security |
| Part 9 Ready for Breeding |
Part 10 Probiotics and the Digestive system |
Part 11 On the record |
Part 12 Gouldian Finch Head Colours |
| The logical place to start is the building or modifying of a building for the aviary. Now is a good time to start planning a new aviary ready for work to begin in the Spring. Try and visit as many other people’s aviaries as you can, see what works and how they have overcome different problems. If you are opting for a new aviary / birdroom, there are some considerations that you need to take into account. Firstly check if there are any Bylaws covering the size of the aviary in relation to the area of your garden especially if you live in rented accommodation. Location of the
aviary is also of the utmost importance. It is probably not a good idea to build at the
front at the house, especially if this is adjacent to a road, as this may attract vandals
or worse. Ideally a site sheltered from the worst of the winds, away from overhanging
branches, if it gets the sun even better, a location reasonably near the house has the
advantage of allowing you to see the birds, also aiding security, additionally it makes
running an electricity supply to the aviary easier. Depending on your budget you may opt for either: 1 A
ready made aviary. 2 Construct
your own. 3 Convert
existing shed or building. The first option saves you the major construction work but you still have to fit out and insulate it to your requirements. Building your own has the advantage that it can be designed to your own requirements and can be considerably cheaper. Converting an existing building can also be advantageous depending on the size. If you do not have a suitable building the purchase of a shed/workshop either new or second-hand to modify is a further option. Let us assume that you have decided on option 2 or 3. Draw up working
plans of the aviary/birdroom, this will allow you to decide on the size and layout, try to
foresee any possible problems which may crop up also to estimate the cost or materials
construction / modify. I will not go into too much detail on most of building techniques as
space is limited and the information is readily available in any good D.I.Y. book from
your library etc. The next step will be to mark out the site for the concrete footings.
This will support the aviary framework / base and as it extends below ground help to
prevent anything from burrowing into the aviary. Once this has set a row of concrete blocks or similar can be set around the perimeter of the birdroom and flights, this will ensure that the timber is kept away from the damp ground. Now to the actual timber construction. The basic framework for both the birdroom and the aviaries is 50 x 38mm (2 x 1 1/2) sawn timber using a straight forward halving joint. The simple braced framework wall panels are clad with a good quality Tongued and Grooved timber. The floor consists of joists (size dependent in span) supported by joist hanger or wall plate, a D.P.C. should also be placed on top of the birdroom supporting wall. The joists should be thoroughly treated with Wood Preservative, over this the main floor can consist of either 18mm (3/4) High Density Chipboard or Plywood Panels the underside of which should also be treated with Wood Preservative or Bitumen Paint, on top of the floor panels place a layer of 6mm Polystyrene sheet or ceiling tiles, this will provide the floor insulation. This in turn will be covered by a sheet of Hardboard. The prefabricated wall sections can be fixed in position and bolted together. The roof consists of double skinned board (Chipboard or Plywood with 50 x 38mm (2 x 1 1/2) softwood frame lined with Polystyrene sheet or Glass fibre insulation this will later be covered by felt. The walls are insulated with either polystyrene sheet or Fibreglass loft insulation sandwiched between polythene sheets. The inner lining can be Chipboard, Plywood or Hardboard. The door is also double skinned and insulated the same way. The windows you
can either utilize second-hand double glazing units or make your own. Once you have made up the windows fix an 18mm
timber fillet around the centre of the window this will give you the optimum gap, you can
glaze the windows with either perspex or Horticultural glass. This can be sealed in place
using clear silicon sealer. Before doing this drill a few drainage holes along the bottom
edge of the window using a fairly small drill bit, this and placing some Silica Gel
crystals between the panes of glass etc will help prevent condensation. Small plugs of
glass fibre insulation should be inserted in the drainage holes to prevent insects getting
in. ADVICE FOR
BEGINNERS ON KEEPING AUSTRALIAN FINCHES Part 2 - The Outside Flight Now that the birdroom is well under way, attention can turn to the outside flight (if required) especially the floor covering. A planted flight looks more attractive than bare concrete, it may also encourage some of the more difficult species to breed, but if the aviary is relatively small the soil may become sour and harbour diseases. A better option may be to have the plants in tubs and containers on a base of paving slabs etc, if you decide on either paving slabs or concrete floor careful attention should be paid to drainage, by including a slight slope to the surface, so that water can drain off and not accumulate on the floor of the flight. The water can be drained out of the flight by pieces of narrow bore plastic set at floor level, lowest point. A further option can be pea gravel (or similar) this however does need digging out from time to time. The construction of the flight is straight forward, using the same sawn timber 50mm x 38mm [2 x l 1/2] screwed and jointed, with a halving joint. The size of the flight panels should correspond to the standard width mesh 36in [90 cm] it is a good idea to make the flight panels in 6ft lengths sub-divided into two 3ft sections this allows for easy handling. When screwed together the panels can be easily dismantled, allowing the flight to be moved or expanded. Once the timber is cut to size unless it is pre-treated it should be given 2-3 coats of wood preservative (preferably water based) and allowed to dry before assembling the panels. These should be covered with 1/2in mesh 19g is ideal, this size mesh is preferable to the 1.0 x 0.5in [2.5 x 1.25cm] mesh, the smaller size helping to keep out mice. A safety porch if required, should be built over the entrance door, if you decide not to have a safety porch the alternative is to have the entrance door as low as possible, about 42in or so in height so that you have to stoop to enter, thereby reducing the risk of birds escaping over your head. The mesh can be stapled in place, pull the mesh down tightly keeping it taut and straight, BE CAREFUL when you cut the roll free, the loose cut edges have a habit of springing upwards and can cause quite nasty injuries, this is where an extra pair of hands come in handy. Once completed the panels can be fixed in place, screw the sections together and fix the panels to the base with frame fixers or similar. The roof of the flight should be covered, to protect the birds from the worst of the weather and the droppings of wild birds, use translucent corrugated roofing sheets fixed over the top of the mesh roof panels, where the corrugated sheeting finishes fix up guttering to carry the rainwater away, preventing it from pouring into the flight. Once the flight is assembled and attached to the birdroom, the finishing touches can be put to the interior of the birdroom. ADVICE FOR
BEGINNERS ON KEEPING AUSTRALIAN FINCHES Part 3 - Fitting-out the Bird Room One of the main requirements will be Electricity supply. A word of
warning, if you do not know what you are doing get expert advice to ensure that the
electricity supply to your birdroom is safely installed. You don't get any extra points
for getting fried in the name of Aviculture. Ensure that you have sufficient power points. The provision of adequate lighting is a necessity, inadequate lighting
conditions during the Autumn/Winter months, can I feel have an adverse effect on the birds
condition, especially during the build up to the breeding season, particularly the early
part, resulting in dead in shell, infertility, etc. The main types
of lighting are either the slim line fluorescent strip type/full -Spectrum or the plug in
energy saving type [fluorescent] for daylight use, the wattage required will depend on the
size of the birdroom, but should be sufficient to ensure that the interior is well-lit,
these should be controlled by an automatic time switch. This will automatically switch on
the lights and switch them off again at pre-set times, the birds will require at least 12
hours of daylight equivalent during the winter months, increasing gradually to 14 hours-
plus going into the breeding time. It is advisable to provide a night-Light also
controlled by a timer; this should be set to come on half an hour before the main lighting
goes off, to prevent the birds being suddenly plunged into darkness. ADVICE FOR
BEGINNERS ON KEEPING AUSTRALIAN FINCHES Before purchasing any new species of finch, make sure you try and find out all you can about it and its requirements, don't buy birds on an impulse, the old saying "act in haste repent at leisure" is very appropriate, especially if you are unable to keep the bird alive when you get it home. Try to buy stock from someone who has experience of keeping and breeding finches, and can advise you on their requirements, try to mirror the conditions and diet that they have been used too initially. It is probably best to buy several pairs of a particular species, rather than single pairs of different varieties, so that if you loose one you will still have the nucleus of a breeding group. Good Australian Finches to start with: Hecks
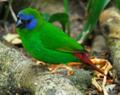
Grassfinch A beautiful and well groomed finch which does well in either cage or aviary, Head silvery grey; upper surfaces and wings pale fawn-grey, darker shade on the wings; underparts fawn; throat patch black; eye stripe black; thigh markings black edged with white; tail black and tapered with two very long central feathers; Bill red; legs orange/red. The sexes are almost alike but the females will usually be found to have a slightly narrower and smaller throat but this should not be relied on, sexing is best done by observation, the cock will sing while ruffling his bib, he will also hop and jig in front of a prospective mate. The interaction between a group of Hecks is very entertaining to see, still very much one of my favourites. Star Finch Another popular and easily bred Australian Finch. Upper surfaces olive green; breast olive; lower underparts pale yellowish green; forehead, cheeks and throat bright red; tail crimson; face and breast spotted white; bill red; legs flesh-coloured. Sexing is easier as the female’s colours are more muted with less Red on the face. Cherry Finch Although not striking in colour it is an attractive and docile finch Upper surfaces tawny brown with some white spots on the wings; crown and throat plum-coloured; underparts off-white barred with brown; Bill black; legs brown. Sexing : Female, plum coloured area of the forehead smaller; chin and upper throat, white; barring on belly less pronounced. Diamond
Firetail An attractive Finch that breeds freely in aviaries, if a true pair can be obtained. They get along well with other finches except at mating time, when they chase other birds especially closely Grassfinches, away from their nesting area, Sometimes incessantly. Lores, black; head , light gray; chin and throat, white; back and wings, deep brown; rump, bright red; tail, black; broad black band across upper breast ; sides of body, black with white spots; belly, white . Sexing : Difficult as sexes are alike, although females usually smaller; and have narrower black band on fore-neck, and brown lores. Confirm by observation, cocks behaviour and song. Chestnut
Breasted Finch An attractive and agile member of the Australian Mannikins that are usually long lived, and get along well with other Finches Crown, back of head, and nape, gray brown with a dark stripe across the middle of the feathers; back, cinnamon brown; wings, rump, and tail, gray brown; central tail feathers, yellow; Sides of head and throat, black; crop and upper breast, chestnut brown and divided from the white lower belly by a black band. Sexing: Difficult. Female slightly paler and duller, with paler breast and thinner dividing line between chestnut brown of upper breast and white of belly. Confirm by observing males song and display. You will note that I have not included the Gouldian Finch, although it is one of the easier finches to get to breed their susceptibility to damp/draughts and their unpredictability as parents, has at times caused frustration and disappointment to beginners. Those listed above are relatively easy to keep and breed, requiring similar husbandry. ADVICE FOR
BEGINNERS ON KEEPING AUSTRALIAN FINCHES Part 5 - Food and Diet The majority of beginners to Australian Finches, cannot be but confused by the various diets promoted for their birds, when all they need to start with is a good Foreign Finch mix, this can then be fine tuned as you gain experience to suit the needs of the various finches you have, a basic mix will contain:
This may possibly be purchased through your local branch, or in bulk by mail order from one of the large seed suppliers advertised in the Aviculture papers/magazines, their seed is usually top quality and free from dust and rubbish. Beware of buying seed that is open to possible contamination or does not look clean, it may be cheap to buy but could prove very costly to your birds. What it boils down to is that you get what you pay for in terms of seed quality. The larger suppliers will usually, if requested, vary the mix to suit your requirements. A lot of finches are not keen on the red millet so this could be left out in favour of other seeds. Finches, I find, also love Budgie tonic seed, which is high in jap millet and other seed they like, this should be fed separately, it also has a lovely aniseed smell. Millet sprays should be fed sparingly as birds have a tendency to gorge themselves on them, and waste other food they should be eating. Soft foods or egg food are mainly used when birds are rearing young and are usually fed twice a day, a good mix I find is:
To this I add sufficient olive oil or vegetable oil so that the mixture is slightly fluffy. [You don't have to mix a kilo if you do not need to; just scale down the quantity to suite your requirements.] Some people prefer to feed their egg food dry in hoppers etc, this can work but some parents have a tendency to feed their chicks to excess on the endless supply of egg food, this can result in wet messy nests leading to problems with the nestlings from bacterial infection etc. I prefer to feed mine mixed with soaked /sprouted seed. Now soaked/sprouted seed has been the source of much debate over the pros and cons of using it, used correctly it is a valuable aid for bringing birds into condition and an important source of nutrition for nestlings, [The germination process which is started by immersion in water changes the nutritional value of the seeds, the protein and vitamin levels are increased markedly] used incorrectly it can result in the loss of young chicks or even parents. Most of the problems arise from not having prepared the seed correctly; this is the procedure that should be followed: Put sufficient seed for two to three days use into a container (1 litre ice-cream or similar container) cover with water to approx 1.0 inch above level of seed, add several drops of Aviclens or other proprietary water sanitizer and mix thoroughly, [these help retard the growth of yeasts, fungi and bacteria.] Replace lid and stand in a warm place like an airing cupboard or similar for up to 24 hrs, no longer or it will start to ferment. Remove and rinse thoroughly under cold running water using a sieve, shake off excess water from each sieve full and tap on paper towel to finish removing surplus water. Replace seed in a clean container with lid and return to a warm place for a further 12 to 24 hrs. then remove. The seed will now have started to shoot. Again cover with water [cold] and add a few drops of water sanitizer, mix and stand for approx 1/2 hr [on a work surface etc.] then rinse under cold water and drain as before. The seed is now ready to use, any surplus can be stored in a container in the fridge, so you can do sufficient to last two to three days. The effect of refrigeration retards the growth of the seed and prevents deterioration. Seed that is required should be removed from the fridge some time before it is needed, this helps to remove the chill and allow any excess moisture to dissipate, and it can then be added to the egg food or fed separately. By adding sprouted seed too the egg food it still retains its crumbly consistency, you should be careful not to make your mix too damp as this can lead to a build up of bacteria. When birds are not breeding/moulting egg food should only be given occasionally as the birds can become overweight and lethargic. Green food: Finches appreciate a little greenwood in their diet, although of little nutritional value it adds variety to their diet and they obviously enjoy eating them as a change from their dry seed. Feed any of the following:
I tend not to give them lettuce as this has a habit of making the bird's droppings too loose. Finches will also take grated carrot, sweet apple cut into chunks and cucumber cut lengthways so they can get at the seeds inside. Also during the summer the heads of seeding grasses, dandelion, sow thistle etc, can be fed. Only collect them from areas that you know are not contaminated by sprays/pesticides or animal and wild bird droppings, and always wash thoroughly before use. Grit: Mineralised grit should always be available to the birds as this aids digestion and provides valuable trace elements to their diet. To the grit I also add crushed baked eggshells, [this helps provide additional calcium] also small amounts of granulated charcoal and rock salt. The grit should be fed to the birds in a shallow dish; this should be emptied out once a week and refilled. The birds will have taken what is of use to them so although grit may remain in the dish they don't want it. Cuttle fish bone can also be provided. Water: Preferably water that has previously been boiled and allowed to cool with a water sanitizer added should always be available in sealed tubular drinkers, to prevent excess fouling. The water should be changed at least once per day especially during warm weather, as warm contaminated water encourages bacteria, the drinkers themselves should be changed regularly this is even more vital when there are chicks in the nest. Soak the drinkers in a detergent solution and use a bottlebrush to clean them thoroughly. Water consumption of finches will vary depending on things like the temperature of their environment and diet, water consumption will increase noticeably when they have chicks and a larger drinker may be needed. Sufficient drinkers should always be provided for birds in flights, this is particularly important if the birds are left alone for most of the day and there is no one to replenish their water. Better to provide too many... ADVICE FOR
BEGINNERS ON KEEPING AUSTRALIAN FINCHES Finch healthcare in general relates to good husbandry, this means providing the correct diet and environment for their requirements also establishing a routine for cleaning and general hygiene. I have seen some bird rooms so spotless that you could almost eat your meals off the floor and others where you have to wipe your feet when you leave them. Both are detrimental to finches, the first does not allow the birds to build up any natural resistance to diseases, while the latter is only one step away from a full scale epidemic. Most people are familiar with the old adage that it is better to prevent an illness from occurring than to cure it, any bird keeper who has at sometime had any of his birds fall ill will be all too aware of this, for that reason, in order to prevent illness or disease, bacteria and other organisms must be kept at a sufficiently low level so that the birds can cope with them, therefore it is necessary to make sure that the birds are kept strong enough to fight off any disease, by ensuring that their immune system is working at its maximum efficiency, good hygiene will help limit the number of bacteria and disease organisms that the birds are exposed to. The most important factor in ensuring that a bird is kept healthy and strong enough to fight off disease, is a good diet, a bird fed on nothing more than seed and water will deteriorate to a level where it will succumb to illness, while a bird fed on a balanced and varied diet will thrive, an important aspect of a good diet is to ensure that nothing is missing especially any deficiencies of vitamins and minerals. Another very important factor in both prevention and control of any disease outbreaks, is good hygiene practise, many diseases are spread via droppings and contaminated food and water, so dishes and especially drinkers along with perches should be kept clean and changed as necessary, soaked in a bleach solution, scrubbed and rinsed thoroughly. Normally hot water and a good quality detergent are sufficient for routine cage cleaning when disease is not present, certain disinfectants should only be used when there is a disease occurrence. When cleaning cages and bird rooms remember to remove as much of the remaining droppings, soft food etc before wiping down as these may reduce the effectiveness of the disinfectant/ detergent solution, also if the solution is not of the correct strength the efficiency will be reduced possibly leading to a build up of resistant bacteria or disease organisms, changing the type of disinfectant / detergent used from time to time will help reduce the possibility of this. Ensure the area is rinsed and dried and do not let birds come into direct contact with any disinfectants. With food items ensure that only fresh seed and items are used and correctly stored in suitable containers to prevent any possible contamination, you should also ensure that there is no possibility of mice or rats coming into contact with seed etc. Overcrowding, lack of ventilation and failure to quarantine newly acquired birds are other sources of problems, all new birds should be quarantined separately for at least four weeks, they should also be fed, treated etc last to reduce the risk of passing any possible disease to the rest of your birds, another precaution is to ensure you wash your hands thoroughly before and after dealing with them, although the birds you have purchased may seem perfectly well there is no way of telling if they are carriers or have something in the early stages, possibly triggered by the stress of being caught up and transferred to a new environment. Stress is a condition in a bird that dramatically reduces their body's normal resistance to disease, although there may be no obvious outward signs of any particular disease the bird may suffer loss of appetite making it more susceptible to infection. Initially new birds should be given the same type of food they have been accustomed to, with any changes in diet being made gradually. Although birds in quarantine should have as much peace and quiet as possible, they should be checked daily to ensure that they remain healthy, look fit and are not fluffed up. Because finches are relatively small birds they have a high metabolism, this means that they have to keep eating continually as they use up energy rapidly. This is why their health deteriorates so quickly if they become ill, it is essential to check all your birds daily for any possible signs of illness or that things are not quite right such as puffed up feathers, partially opened eyes, and laboured, irregular breathing. If the bird is at a more acute stage it may no longer sit upright on the perch but will assume a more horizontal position with its tail drooping downwards or sit weakly on the floor. Because of their small size finches need warmth if they are to recover, you can use specially designed hospital cages, a more versatile alternative is a clip on infrared heat lamp, this avoids the added stress to the bird of having to be caught and transferred to the cage, if the bird is however in a flight with others this may have to done, depending on the nature of the suspected illness .The lamp can be attached to the front of the cage adjacent to the perch at one end of the cage. This allows the bird to move closer to the heat source when it needs to, a stopgap alternative to the infrared is the 6OW red fireglow bulbs, the light that these give off is not harsh and will not disturb them at night. If you are not sure if your bird is suffering from a disease seek advice from a more experienced branch member initially or an avian vet. Overgrown
claws/beak Excessive claw length can cause problems for finches, such as getting caught up on everything in their cage/ flight leading to possible loss of the nail, claw, broken limbs or even death. Mannikins and Munias especially need checking regularly. It is quite easy to trim a finch's claw, take the bird in the hand with its back laying in the palm, then take the leg, near the foot, between your middle finger and thumb. It is then quite easy to control the foot while you're cutting the nails with a small pair of nail clippers in the other hand. Care must be taken not to cut into the quick or blood vessel in the claw. In the light this can be seen quite easily as a dark line running through the horny part of the claw. If the blood vessel is accidentally damaged, use a Styptic pencil or dip a paper tissue into some wet potassium permanganate crystals and dab the tissue onto the bleeding part, this should stop the bleeding. These crystals can be obtained from a pharmacy. Beaks; a beak that has grown out of shape needs to be trimmed back to its normal shape. Using a small pair of nail clippers, hold the bird with its back in the palm of your hand and restrain its head gently but firmly between your forefinger and thumb. Taking care not to cut into the blood vessels, carefully trim the beak back to shape. If you are not sure about how to carry this out get an experienced member to show you. Eye problems These may simply be caused by a finch rubbing its head on a dirty perch, or by a foreign body such as a grain of sand, setting up an irritation in the eye that appears closed and swollen. If the affected finch is in an aviary, it will be easier to treat if it is caught and transferred to a cage. For minor problems, bathe gently with a lukewarm saline solution initially, if this does not improve the situation an ophthalmic ointment can be obtained from the vet. Mites The main types of mites that affect finches are the feather mite, which feeds on skin and feather debris and can cause irritation that leads to feather plucking. The best therapy against feather mites is good hygiene, keep cages as clean as possible, and allow the birds sufficient bathing facilities or give them a fine spray regularly. The other mite that can cause problems is the Red mite; this does not live on the bird itself but spends the daylight hours hiding in cracks and crevices around the bird room, cages or aviary, coming out during the hours of darkness to feed on the birds blood. Although a single mite itself does not take a large amount of blood, if present in large numbers they can spread disease cause anaemia, and even death. Nesting birds and their young are particularly at risk, the mites may be visible as dark specks around the sides and top of the nest box, where they thrive. If you suspect that mites may be present, initially spray the birds and their accommodation with one of the pyrethrum based anti-mite sprays [this is natural based product derived from the pyrethrum flower] which is harmless to birds. Then hang a suitable size Vapona insect strip in the bird room, this should keep it mite free if renewed as recommended. Common Disorders Egg binding Egg binding is a symptom not a disease, a symptom that something is amiss with the Husbandry/Diet. Some of the most common causes of egg binding are:
Symptoms The hen will stop eating and will sit low on the perch fluffed up and straining at times, may have small or no droppings due to the egg blocking the vent. The vent area will appear swollen; with careful examination the egg can be felt stuck in the lower area of the abdomen. Eventually the hen tries so hard to lay the egg that she exhausts herself, ending up on the bottom of the cage/flight, listless with her wings and head outstretched. Prevention If finches are housed and fed correctly, under normal circumstances egg binding should rarely occur, before breeding any finch ensure they are the right age, and have been brought into breeding condition with a balanced diet and adequate calcium in the form of mineralised tonic grit etc. Stress can have a detrimental effect on the breeding finches, stress from draughts or incorrect temperature, and while some finches thrive in a colony others need the security of individual breeding cages or flights, also some prefer to be in a quiet part of the birdroom, where they are not disturbed every time someone goes in or out of the birdroom. Do not be tempted to try and over breed a pair, this will be not only detrimental to the hen but also the resulting youngsters will be of an inferior quality, ensure the hen is given sufficient resting period after breeding. Treatment An egg-bound hen requires urgent treatment; move her to either a hospital cage or a small cage fitted with an infrared lamp where the temperature should be increased to 85-90�F. Place seed and a shallow container of water in the cage, this will help to increase the humidity, this will quite often do the trick. Do not be tempted to try and help the egg out, unless you know what you are doing. Once she has passed the egg, the hen may appear to be perfectly all right, however she should not be allowed to breed again until she has been rested and the diet or cause of the problem rectified. Moult The moult, or changing of the finches feathers is a naturally occurring annual occurrence and normally problem free. During the moult the birds spend a lot of time resting, and they become quieter, the whole process can take several weeks. It is during this period that the finches require a well-balanced protein rich diet (feathers are made up of over 85 percent proteins). For a successful moult, finches must have available a continuous source of protein rich food, any deficiency or shortage in the supply can lead to the formation of fault bars in the feathers, causing a weak spot which may later break, or cause permanent damage to the flight feathers until they are replaced at the next moult. Occasionally problems may occur that cause what is referred to as an abnormal moult; this can be caused by a sudden shock or fright, disease, and extremes of temperature. A further cause of abnormal moult can be from a malfunction of the finches thyroid gland. Diarrhoea or
Wet Vent This can often affect an individual finch or a whole flight, it does not necessarily mean that it has contracted an infectious disease, but may have a more minor intestinal complaint. However as a precaution the bird should be placed in a cage on its own, or with other similarly affected finches and provided with an additional source of heat, such as an infrared lamp or similar, and maintained at 85�F, diarrhoea can also lead to de-hydration through loss of fluids. A finch will therefore require an easily digested source of energy in the form of fluids Make up a solution of (1) one heaped teaspoonful of glucose or honey to approximately one and a half pints of water, to this I add a few granules of garlic (garlic is a natural anti-biotic) Diarrhoea can result from a number of causes; for example change of diet, as with a newly acquired bird, excess of green food, stale food, Chill/ cold, as well as viral or bacterial infection. Stress is another much overlooked cause of upsets in finches, a change of environment as with newly acquired birds, has the bird been to a show, or transferred to a different flight, some are not happy in large groups and vice versa. If the finch is still eating and drinking and shows no other visible signs of illness there is a chance that it will get over the problem in a few days. Sometimes the use of a Probiotic may be beneficial. Probiotics are cultures of harmless bacteria that are normally present in the finches gut; the idea is that these will help restore the correct balance by overwhelming the germs that are causing the problem, restoring a healthy gut. Visible signs of upset intestines include being lethargic, fluffed-up, the vent is wet and the feathers in this area are matted together. In serious cases the finch will spend its time on the floor hunched up with its head tucked under the wing. The droppings will appear very watery, and depending on the type of infection vary in colour. There are various elements to most droppings. Urine consists of crystal urine called urates (which is a white chalky type substance) and a non-crystal urine (clear water), sometimes mixed causing cloudy white urine. Important changes can occur to both the colour and the amount. The third part of the dropping is the faeces which consists of digested food. |
Increased urates |
Dehydration |
Increased urine |
Eating food high in Water (green foods), Drinking a lot, Infection |
Green or yellow urates |
Liver disease urates |
Red urine or urates |
Internal bleeding |
| What the finch eats can also affect the colour of the droppings, i.e. Seed and green foods produce a green dropping (urine not affected) likewise any food that was mainly red or say black in colour would affect the colour of the droppings (urine not affected) the faeces should be solid and tubular; it can be coiled or uncoiled sometimes broken into pieces. Any undue change in colour that cannot be explained by diet requires further investigation , also if the finch does not show signs of improvement after a few days of initial treatment or an infection is suspected consult a more experienced finch keeper or a vet Remember that the large, wet droppings produced by breeding hens are normal and should not be confused with diarrhoea. ADVICE FOR
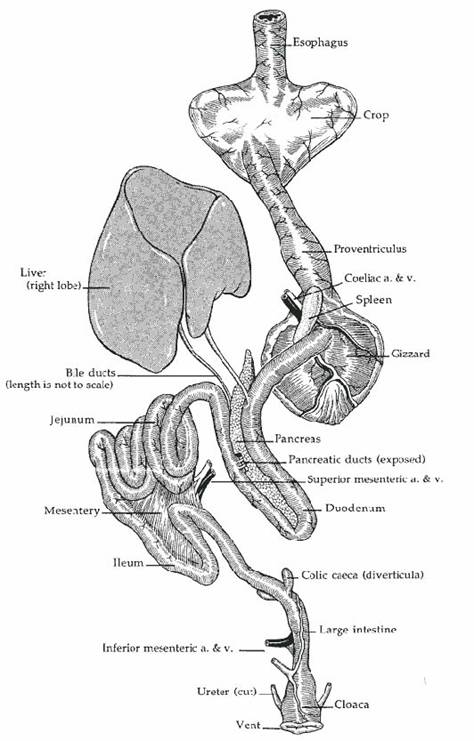
BEGINNERS ON KEEPING AUSTRALIAN FINCHES Before you can think about breeding your finches you need a true pair. How can you tell if you have a pair ? Knowing the topography or various parts of a finches body is useful when it comes to sexing pairs. Descriptions of the parts of the bird:
Knowledge of the way that colours are produced in birds is useful when it comes to understanding the various colour variations. The main pigments that produce the colour in birds are the carotenoids and melanins. Melanins are characteristically black or brown in colour and are responsible for blacks, browns, greys and rusty reds in birds. Melanins also provide a basis for what is called "structural" colouration - in that they provide a background for structures that reflect particular colours of light. This mechanism is responsible for most iridescent and blue colours in birds. Reds, yellows and orange colours result from the carotenoid pigments. The basic carotenoid structures can not be manufactured by animal cells and must be obtained via their diet. Birds then biochemically modify these colours, if they have the appropriate enzymes to do so (a genetic characteristic), and they are incorporated into the feathers. Greens occur, as in gouldians and parrot finches, as a result of a combination, or overlay, of carotenoid yellow pigment and blue structural colouration. Similarly purples can be produced by a combination of red carotenoid and blue structural colouration. Whites occur when no carotenoids or melanins are present. Adaptive functions of colour in finches:
All feathers wear out in the course of time, light coloured ones are less durable than dark ones and wear out more quickly. Finches that come from areas of dense vegetation fly only in short spurts. The path of their flight is slightly arched. Long-tailed Hecks Grassfinches, and other species that live in open landscape fly in great arches. Finches that live in areas of reed beds etc can synchronize turns and other flight manoeuvres in a flock, all the finches flying in the same tempo. ADVICE FOR
BEGINNERS ON KEEPING AUSTRALIAN FINCHES This advice is applies to all Finch keepers not just beginners, now that the nice weather is with us it is a good time to take a good hard look at your birdroom / aviaries just how secure are they? Imagine how you would feel, if one day you came home and found that your entire collection of finches had been taken. It is always sad to read about birds being stolen, but on numerous occasions little stands in the way of the thief and the birds, although people take every precaution to protect their homes quite often garages / garden sheds containing expensive garden & DIY equipment, and birdrooms / aviaries especially if they are some way from the house are left relatively unprotected. So what can we do to protect our birdrooms and aviaries, what is the best deterrent to a thief ? The simple answer is - any deterrent! Generally thieves look for easy access were they could get in and out as quickly as possible without being noticed. Therefore even a small number of effective security devices are better than none and can make the difference between a burgled birdroom and a secure one. The further an aviary / birdroom is from the house the more vulnerable it becomes, especially if your property borders a public footpath or road, if you have outside flights the noise of birds will without doubt attract the attention of prying eyes. Some form of screening can go some way towards combating this, Leylandii or other type of suitable hedging can help, although much maligned the Leylandii if kept under control can prove to be an effective all year round screen. A good form of natural defence can be the use of prickly plants like pyracantha, berberis or cultivated blackberries [not the thornless variety] these can be more of a deterrent than a normal fence or hedge, they can also be grown along the top of fences on sections of trellis making them difficult to climb. By their very nature most birdrooms/aviaries are of a timber construction, which makes them vulnerable to break-ins, the ideal solution would be a brick or block construction, this can however be expensive not to mention the problems due to lack of space and other building restrictions, so for most of us the timber construction is the only option. Timber buildings by their very nature are always going to be vulnerable to break-ins. Firstly the walls, weather boarded sides expand and contract depending on the weather, which means that there is always a seam that can be levered and the board removed quite easily and quietly. Once the first board has been removed, it only takes a matter of time to remove sufficient to allow access to the inner lining of the birdroom. Which in most cases consists of hardboard, plywood or similar. So what can be done to make them more secure ? First replacing at intervals, the nails with security screws can secure the timber cladding. There are two main types - one is the simple Clutch head screw, this is a 'one way 'design, which allows you to put these in with an ordinary slotted screwdriver, but removing them is virtually impossible. The second is the Star drive tamper resistant screw; these can only be fitted or removed by the use of a compatible star drive security screwdriver bit, very effective. You only need to secure every second or third length of cladding. The internal walls can be made more secure by fixing a heavy gauge mesh to the walls, after this has been fixed in place the normal covering of hardboard, ply etc can be fitted over the top as usual. This is obviously best carried during initial construction of the birdroom if possible. The same principle applies to the roof of the birdroom as the walls and the same method can be used. Doors are another vulnerable point, too many people still rely on the old Hasp and padlock method of securing the doors, this fails basically on two points the 'U' piece of the padlock is exposed leaving it vulnerable, the modern type of high -tech bolt cutters which can go through them like knife through butter. The hasp is susceptible to being levered even if the fixing screws are concealed. A door fitted with a single lock is still at risk from being forced, the answer is to spread the load with rack bolts, hinge bolts [especially if you have external hinges], and a pair of locks - a cylinder lock or a mortice - spread some distance apart. Remember that a lock is only as strong as the door itself .If your door and surrounding frame are flimsy reinforce them before you waste time and money on fitting locks and bolts. All these items are available from good DIY stores who usually carry a large and varied stock of security items, varying in price from a few pounds. Windows, because of their usually timber and glass construction, tend to pose a bigger security problem than doors. There are a number of different non-expensive types of locks available depending on the type of window you have i.e. outward opening hinged, sliding or sash. These do not however stop anyone from breaking the glass to gain entry. An internal hinged metal window grill made from heavy gauge mesh, padlocked at the bottom opposite the hinges is an efficient visible deterrent as well as allowing easy access to the glass for cleaning etc. Your first line of defence against burglars should always be strong locks on all vulnerable entry points to your birdroom, these can however be backed up by electronic deterrents. The sight of an alarm siren or bell prominently displayed on the outside wall of a birdroom can in itself deter the majority of burglars. Electronic deterrents range from the simple self contained battery operated device that emits a high pitched noise when the contacts (placed on the opening side of the window or door and the frame) are parted to an electronic alarm system that start at less than a price of a pair of gouldians. There are basically two types of intruder alarm systems - the hard-wired that incorporate individual sensors that monitor all entry points of entry. These are vibration sensors for fixing to the glass, contact breakers for door and window frames. Each sensor is connected by bell wire to a central control unit that is wired into the mains. The second system is the wire free, which as it suggests is free from any connecting wire instead relying on passive infra-red (PIR) detectors that sense the presence of an intruder and transmit a radio signal to a central control unit, this in turn triggers the siren or bell. You can have as many detectors as you like, and each one is set with the same simple code that will be recognised by your control unit. Wire free systems are invariably fitted with a magnetic-contact transmitter, which protects the main entry/exit to the birdroom. This will activate the control unit and sound the alarm when the contacts are separated. A delay can be set to allow you plenty of time to deactivate the alarm when you enter the birdroom. The PIR system does have one drawback however a combination of dust, feathers and the odd escaped finch can unfortunately make them unreliable in most birdrooms. A useful addition, especially during the hours of darkness for the exterior of the birdroom, is lighting that is activated by sensors when someone breaks the beam. These can consist of either unit with a built in PIR (Passive infra-red) detector or what is called stand-alone PIR, which is a detector unit that can be used to control a number of lights linked to it, these are all quite cheap, and easy to fit. It is unwise to light the area of your birdroom permanently at night. This can have the opposite effect of what is required and draw attention to the site, far better to use sensors and detectors. It is only the area immediately surrounding the birdroom / aviary that needs to be covered, so lighting ranging from 60w to 150w is adequate there is no need for 500w units, which will not only illuminate the whole neighbourhood but can be a nuisance if they are wrongly sited. Remember to have all lighting facing away from the birdroom so that the birds are not disturbed when they are activated. C.C.T.V. Systems -There is a large and varied number of CCTV cameras, infra-red detectors and suchlike for the birdroom/aviaries and garden area, reasonably priced, effective and easily fitted, usually linked to your TV or video to give a picture on a spare channel, the camera can be sited inside or out side the birdroom or anywhere in the garden. Some people argue that it is best not to advertise the fact that you have something of value on your property, by having a camera /cameras prominently displayed and /or warning notices that the equipment is in use. Others take the view that even a prominently placed dummy camera containing nothing more than a flashing LED display, is an ample deterrent to any aspiring burglar. You would have to be a brave person or a fool, to take a chance that a particular CCTV camera is not what it seems. There are a number of very small cameras on the market, that can be set-up and hidden almost anywhere in the home, birdroom or garden. Their main drawback is that they are virtually undetectable, and as such cannot act as a "visual" deterrent. They may help catch the thief but they certainly will not deter them from breaking in. TO SUM UP:
ADVICE FOR
BEGINNERS ON KEEPING AUSTRALIAN FINCHES Part 9 - Ready for Breeding When most people have bought their Finches and settled them in they usually want to breed them, I would however urge caution, firstly if they are young birds they may not be old enough this can lead to problems such as the inexperienced pair not brooding or if hatched failing to feed the youngsters. If the pair are of breeding age, are they in condition ? The move to a new environment can unsettle them, until they adjust to the new regime, try to simulate their previous diet initially and make any changes gradually. In some finches the colour difference between the male and female is distinctive, making visual sexing quite easy, it is however advisable to obtain more than one unrelated pair if possible, this is not only added insurance if you happen to have one die, but you can always swap the birds about if they prove not to be compatible, a further benefit is that if both pairs survive and breed you will be able to make up unrelated pairs of youngsters to sell or exchange. Where it is difficult to visually sex a particular species, it is probably best to obtain a small group of them, and mark them by using a different coloured split ring on each individual, place them in a flight, as they form pair bonds note the colour of the split rings on each pair. The pairs can either be left in a flight or transferred to cages as required. There is much debate about which is better cage or flight! There is no hard and fast rule, a better result with breeding pairs is usually achieved by housing them in the controlled environment of separate accommodation, be it a normal cage, large flight cage or a flight. Some people prefer to keep and breed their birds in colonies. In a colony however you may find that only the more dominant pairs will breed and there may be fatalities to those at the bottom of the pecking order, due to aggression. A lot depends on the nature of the species, are they for instance a sociable species like Mannikins were the stimulus of a colony helps trigger the breeding, or like the Parsons or even more so the Crimson finch, were it is almost impossible to keep several pairs, or even one pair together with other similar finches in a flight / aviary because there simply is not enough room for them to get out of each others way. If you wish to try colony breeding it is probably best to keep only one pair of each species per colony, unless they are a particularly sociable species, ensure also that there are plenty of nesting receptacles, at least two per pair with plenty of nesting material and if possible try to introduce all the birds into their flight at the same time this can help cut down on the aggression as they will all be to busy finding their way around. If you introduce a new Finch into an already established community, the established birds will probably chase it around as they defend their territory. This can mean you having to remove any over aggressive finch or even the newly introduced bird. Finches that are picked on or intimidated by others never attempt to breed. Out of the breeding season I find it beneficial to house the cocks and hens in separate flights, which being single sex cuts down on the aggression and helps to keep the birds fitter. It also helps to stop them becoming overweight. When they are not breeding I maintain my birds on an austerity diet, consisting of a balanced seed mix, with only the occasional softfood supplement and green food, then as you require to bring the birds into breeding condition the protein level is increased by the use of egg food/insectivorous mix, sprouted seed even livefood, used in a balanced way and not overfed so that they become overweight. (This simulates the conditions in the wild) This coupled with gradually increasing the length of the day using electric lighting controlled by time switches and a daily misting spray with water (I prefer this to baths, so it appears do the birds) should do the trick .You will soon learn when they are just about ready. The birds will start to look in the peak of condition, feathers almost glowing and their colours bright, the cocks will become more vocal and active jumping from perch to perch trying to impress the hen. If the cocks and hens are in separate flights you will find that they will be hanging on the mesh calling to each other. Most Australian finches are usually eager to breed. If after you have paired them off they show no interest in nest building, one or even both of the pair may not yet be in full breeding condition, or they may not be compatible. You can try separating them for a couple of weeks or so, re-introduce them possibly in a different cage etc. If after say a couple of weeks there is still no indication of nest building, you will have to split them up and try different partners. Another problem that can occur is that the birds will lay but refuse to incubate, this can happen if the birds feel insecure by either, being disturbed due to excessive nest inspections or other birds if they are in a flight The nest box position itself may cause the birds to feel insecure, you may need to have the opening facing a different direction or especially in a flight the entrance screened by foliage to increase the sense of security for the birds. When it comes to nest boxes there are a number of different designs that can be used, the main consideration however is that it should be large enough to accommodate the parents and their brood, especially if say it is a large brood it can get quite crowded. Give the birds a choice of types i.e. half fronted or enclosed, even in a cage. Sometimes the preference can depend on what type of nest the hen was reared in. Flights provide plenty of choice, you are not restricted to just nest boxes you can utilise things like the cardboard tubes from the centre of carpet rolls. Cut to size, capped at one end, then fixed at an angle these are readily accepted. Plastic flowerpots are also useful especially if you can blank off the bottom half; I have known even Gouldians use these in a flight. Of course if you have clumps of branches or a partly planted flight some species will build their own nest site given sufficient materials. i.e.- Hay (as long as it is not dusty), dried grasses, coconut fibre, sisal, raffia, dried moss Avoid materials like lengths of cotton, that could get tangled around the bird's leg or claws resulting in the loss of the claw or a dislocated leg. ADVICE FOR
BEGINNERS ON KEEPING AUSTRALIAN FINCHES Probiotics One of the things that crops up with regard to beginners is the confusion over the use of Probiotics. Probiotics are mainly a supplement to the diet that increases the amount of what is referred to as 'good' Bacteria in the gut, which are needed in the digestive system in order to process the food effectively and come in either liquid or powder form for application into the drinking water or food. The most commonly known one is Lactobacillus Acidophilus; this is a naturally occurring micro organism, which is found predominately in the digestive system of man and all warm-blooded animals also naturally occurring product in some foods such as yoghurt. But yoghurt, which is made from milk, is species specific for mammals - not birds. Birds are not able to digest more than a little amount of lactose, and will suffer diarrhoea if fed foods that are high in lactose content-such as dairy products. The benefits of milk products transformed by lactobacilli is that they are more easily digested by birds due to the creation of the enzyme lactase Cultured products contain lactic bacteria; which is a single cell organism this transforms sugar into lactic acid, and helps to slow down the development of some disease organisms. Many disease organisms cannot live in an acid medium, such as lactic acid. It helps remove them by giving them less room to grow and denying them attachment sites in the digestive system. Lactic acid along with acetic, formic, benzoic and hydrogen peroxide which is a colourless semi fluid liquid used as an antiseptic, are found in cultured products and help to slow down the function of harmful micro organisms by lowering the ph level. Lactic acid is also helpful in the absorption of minerals especially calcium. One of the biggest threats to the 'good' bacteria balance is the use of antibiotics. Unfortunately antibiotics do not discriminate between the good and bad bacteria and while doing their job of destroying the disease-producing bacteria also take out the good ones as well. Treating with a probiotic immediately after the use of antibiotics will help to repopulate the gut with good bacteria and help prevent any possible secondary infection. Birds can suffer from a number of disease problems, which are brought about by stress and other environmental reasons, add to this any nutritional deficiencies, can and will lower a birds defensive system allowing disease organisms to take hold. The most important feature of any disease control strategy is prevention, this can be by quarantine, good hygiene and good Birdroom practices. Routine probiotic use can help in the prevention of disease in the Birdroom/Aviary, Probiotics can if you wish be given on a regular basis up to two or three times per week. Digestive
System |
Red-headed x Red-headed |
Yellow x Red OR Red x Yellow | Black x Black |
Red x Black | Yellow x Yellow | Black x Red |
50% red cocks |
50% red/yellow | 50% black cocks |
50% red/black cocks | 50% yellow cocks | 50% red/black cocks |
50% red hens |
50% yellow/red | 50% black hens |
50% red hens | 50% yellow hens | 50% black hens |
Red/Black x Black |
Red/Black x Red | Red/Yellow x Red/ Yellow |
25% red/black cocks |
25% red cocks | 12.5% red cocks |
25% red hens |
25% red hens | 12.5% red hens |
25% black cocks |
25% red/black cocks | 25% red/yellow cocks |
25% black hens |
25% black hens | 25% red/yellow hens |
|
12.5% yellow cocks |
|
|
12.5% yellow hens |
These are only a few of literally dozens of different combinations possible, careful record keeping is essential if you wish to experiment with any possible matings. |
 |
 |
 |
 |
 |
 |
 |